|
Electronic File Guidelines
These guidelines will help you create a file that will produce a professional-looking printed product. They will also help you provide us with a document that will need few (if any) modifications as we are making it ready to print. This will result in a savings to you, as we must charge for any time our design team must spend in making your file ready to print on our equipment.
At your request, we will print a proof at no cost for you to review. Additional proofs because your artwork does not meet our guidelines are an additional $25.00.
Please review these guidelines before designing your work, and feel free to contact us if you have any questions.
DOCUMENT SIZE:
Before you begin, determine what size your finished document will be, then set up the document page size in your program to match the finished document. If you are creating a business card, your page size in your graphics program should be set at 3.5" wide X 2" high, unless your design will have a bleed.
COLORS: (top)
Use only CMYK or Pantone colors. If RGB colors or other non-CMYK or non-Pantone colors are used, they will be converted to CMYK. This conversion will almost certainly change the appearance of the colors when we print, sometimes dramatically. For a rich, dark CMYK black, use C30, Y30, M30, and 100K.
The colors you see on your computer screen are not necessarily the colors that will print. Computer monitors will change as they age, so what you see on your monitor will not necessarily match what we see on ours. Additionally, unless your entire computer system is professionally color calibrated, what you print on your inkjet or color laser printer will not necessarily match the actual intended color. Part of our printing process is to provide you a proof so that you can make sure the final, printed color meets your expectations.
GRAPHICS (top)
Any bitmap graphics (photos, fountain fills, etc.) that are part of your design must be 300 dpi or greater at the size it will be printed, and must be embedded and not linked. If your graphic art does not comply with these requirements, quality may be an issue and additional costs may be incurred for print setup. (Note that a graphic you have copied from a web site will be of low resolution and is not likely to work well when printed.)
See the following guidelines that relate to various programs that you might be using. Please contact us for additional information if you are unable to provide one of the file types listed below.
FILE TYPES See the following file type guidelines that relate to various programs that you might be using. Please contact us for additional information if you are unable to provide one of the file types listed below. (top)
Adobe Photoshop:
A Photoshop file is also a bitmap file, which means that the image is created from a vast number of colored dots. Lines and shapes will not be as sharp as they would be if created in a vector program such as Illustrator, Corel Draw, or even Microsoft Publisher. For the printed document to be as sharp and crisp as possible, create it at the finished size, at a minimum of 350dpi for color, or 600 dpi for black and white.
Adobe Illustrator (CS5 or earlier):
• Convert all text into "outlines" in your document.
• If you are inserting a graphic into your Illustrator document, it must be embedded . If it is linked rather than embedded, you will need to provide us with the original graphic file in addition to your Illustrator file.
Corel Draw (Version X7 or earlier):
• Convert all text to curves in your document
• Use only CMYK or Pantone colors
• If you are inserting a graphic into your Corel Draw document, it must be embedded . If it is linked rather than embedded, you will need to provide us with the original graphic file in addition to your Corel Draw file.
Adobe InDesign, Pagemaker:
• Output for final design to a PDF file, using the guidelines below.
Microsoft Publisher, Microsoft Word, and Microsoft PowerPoint:
• We do not recommend these programs for creating layouts for printing. Fonts and layout objects may change, sometimes significantly, when the document is opened on a computer other than the one on which it was created.
• You may create a PDF (see below) from your Microsoft document so we can print from that, or we will print your document one time at our standard rates so you can review and proof it prior to the final print. Any changes that need to be made will be done at our standard rate for design work.
PDF FILES (top)The PDF file format (PDF is an acronym for "Portable Document Format") was invented by Adobe Systems, and is an almost universal way to share and print a file, regardless of application or operating system. We recommend that you provide your files to us for printing in the PDF format. This will lessen the possibility of unforeseen changes in your document, thereby speeding up the printing process as well as reducing the potential of incurring additional costs for us to modify your file.
Creating a PDF File: Some programs have a built-in option for creating a PDF file. Check the help documentation of the program you are using, and follow the instructions. If you have purchased and installed the full version of Adobe Acrobat (NOT Acrobat Reader), you should be able to create a PDF file through the printing process. Instead of choosing your normal printer, choose the "Adobe PDF" selection in your printer selection dropdown menu. Select options to conform with the guidelines below, and when you select "print" a PDF file will be created.
If you are unable to create a PDF file as described above, there are several free PDF writer programs available on the internet. Some are excellent.
• All fonts and images must be embedded in the PDF file.
• All images and graphics need to be high-quality, high-resolution images (at least 350 dpi for color images, 600 dpi for gray-scale and black images).
• The PDF file must be saved as a high-quality, press-quality, or comparable file.
• The PDF page size must be the same as the finished document size (i.e., if you create a business card (standard size is 2"x3.5"), the PDF page size should be 2" x 3.5". (See "Bleeds" below for exceptions to this rule.) The business card image should not be centered in the middle of a letter-size page.
MARGINS (top) - If your finished product will have unprinted margins, use the following guidelines: (top)
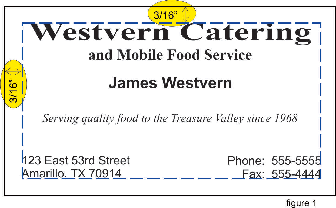
• Business cards must be sent 1-up with at least a 3/16" unprinted margin unless they are designed to have a bleed (see below).
• Envelopes should allow 3/8" margin from the top and side.
• Letterhead must have at least 3/8" at the top and 1/4" along the sides and bottom
• Postcards, flyers, brochures, and sales sheets must have at least 1/4" margins
PRINTED MARGINS (BLEEDS) (top)- "Bleed" is the term used when a design contains images (including a background) that will print all the way to the edge of document. If your design includes a bleed, your design must be set up so that each image extends at 1/8" past the edge of the finished piece. Please be aware that printing a document that has a bleed will often be more expensive than printing it with margins. If this is a concern, be sure to contact us before creating your design.
Setting Up Bleeds: Follow these steps to insure that your document bleeds will print as expected (also see the Business Card section):
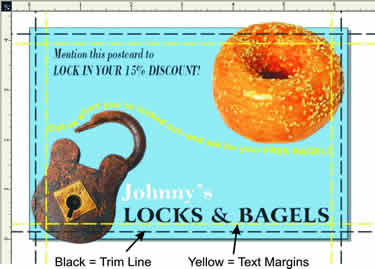
• Set your document dimensions (both horizontal and vertical) 1/4" larger than the finished document (for a 4"x 6"postcard, set your document size to 4-1/4" x 6-1/4"). Place guides 1/8" in from each edge. These guides will indicate where the document will be trimmed.
• Place any image that will bleed so that its outside border is at the edge of the document. The guidelines will show you what part of the image will be trimmed off.
• Use additional guides to line up text so that it is at least 3/16" in from the trim lines. Text that is too close to the edge of a document looks crowded and unprofessional.
BUSINESS CARDS(top)
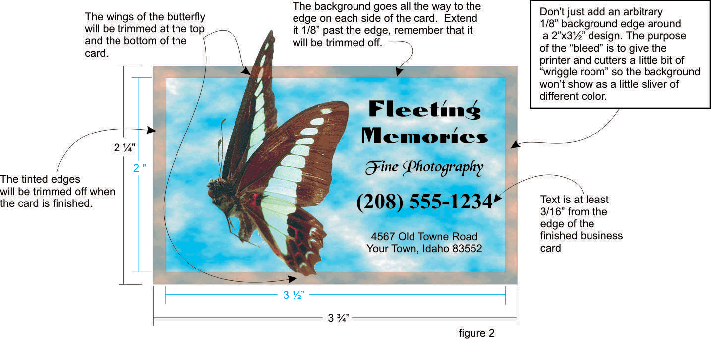
The first step in designing your business card is to set the page size in the program to the actual size of the business card. A standard business card is 2" x 3.5". If there will be bleeds (see below), set the page size to 2 1/4" x 3 3/4".
NOTE: Save your file in an accepted format as you have designed it. Do not attempt to put more than one business card on a page. We will place it multiple times on a larger page, the size of which will be determined by the method of printing.
Design your card so text and other important elements are at least 3/16" from the edge of the finished card. Elements closer than 3/16" will look crowded, and the card will appear less professional. A border close to the edge of the card may result in the finished card appearing crooked or lopsided, so try to avoid designing with a border!
If your design goes all the way to the edge of the business card (this is called a "bleed"):
> Design the card so the "bleed" image extends 1/8" past the side (or sides) of the card. This means you will need to set up your page size for 2-1/4" x 3-3/4" to accommodate the extra 1/8". Keep in mind that this extra part of the image will be cut off when the cards are trimmed to size (See Figure 2).
| 
